Table of Contents
Introduction
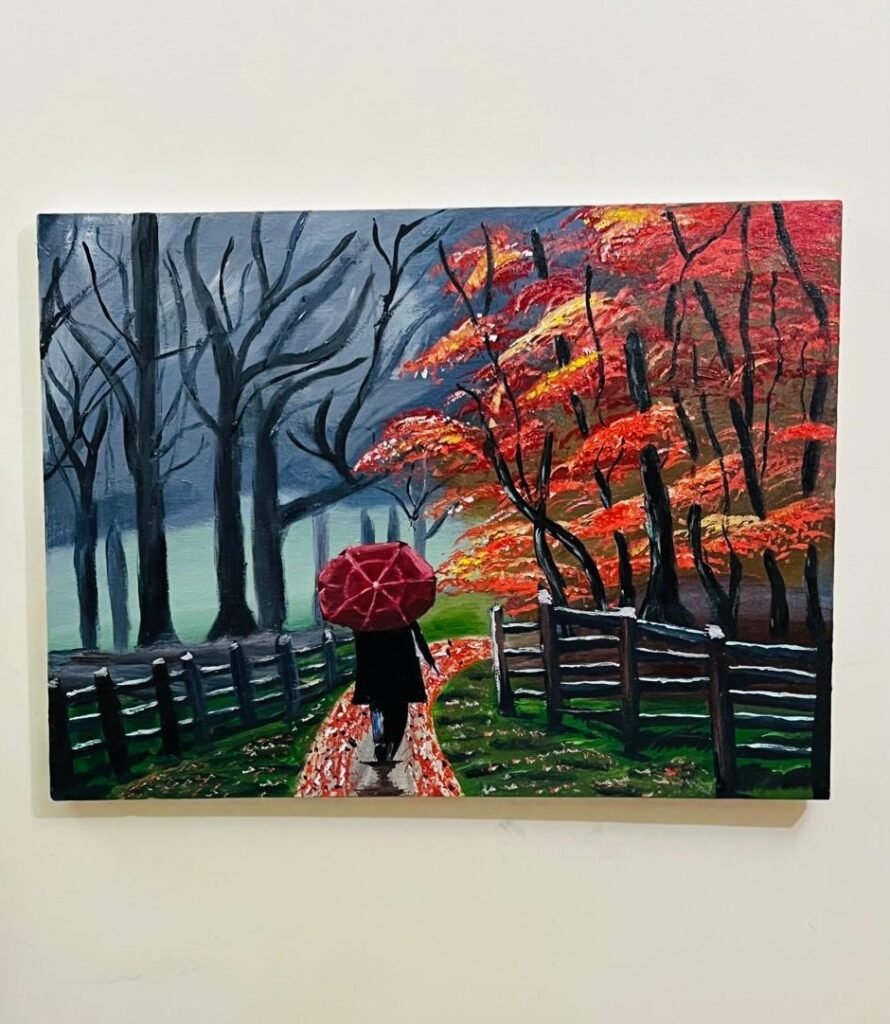
The beauty of autumn has long inspired artists to capture its vibrant hues and serene landscapes. This season is filled with the rich colors of falling leaves, the crisp air, and the peaceful ambiance that makes it a favorite among nature enthusiasts and painters alike. In this tutorial, we’ll walk you through the process of creating a stunning autumn forest painting, focusing on a lone figure walking down a pathway surrounded by colorful autumn trees, holding a red umbrella. This acrylic painting tutorial is designed to guide both beginners and seasoned artists in capturing the essence of fall landscape art with ease.
Materials You’ll Need

Before we dive into the acrylic painting tutorial process, let’s gather all the necessary materials. Here’s a list of what you’ll need to complete this autumn-inspired artwork:
- Canvas: A 18×24 inch canvas works well for this project, but feel free to choose the size that suits you.
- Acrylic Paints:
- Titanium White
- Mars Black
- Burnt Sienna
- Raw Umber
- Cadmium Red
- Cadmium Yellow
- Phthalo Blue
- Sap Green
- Ultramarine Blue
- Brushes:
- Flat brush (large and medium)
- Round brush (small for details)
- Fan brush (for trees and leaves)
- Liner brush (for finer details)
- Palette: To mix your colors.
- Palette Knife: For adding texture to the pathway and trees.
- Water and Cloth: To clean your brushes between colors.
- Easel (Optional): For holding your canvas.
Step 1: Preparing Your Canvas
Start by preparing your canvas with a light wash of color. This base layer will help create a cohesive look as you build up the layers of your painting. For an autumn scene, a light wash of Raw Umber mixed with a bit of water can give the canvas a warm undertone that complements the fall landscape art.
Allow the base coat to dry completely before moving on to the next step. Acrylic paint dries quickly, so this should only take about 10-15 minutes.
Step 2: Sketching the Composition
Next, use a pencil to lightly sketch the main elements of your painting. Acrylic painting tutorial, The focal point of this artwork is the figure with the red umbrella, walking down a pathway. Sketch the pathway first, starting from the bottom of the canvas and curving it slightly as it recedes into the background. Add the figure at the center of the path, ensuring that it is proportional to the surrounding elements.
Now, sketch the trees that line the pathway. These trees will be bare, reflecting the late autumn season. On one side of the pathway, we will have trees with vibrant autumn foliage to add a pop of color to the scene.
Step 3: Painting the Background
With the sketch in place, we’ll begin by painting the background. For the sky, mix Titanium White with a small amount of Phthalo Blue to create a soft, muted blue. Apply this color to the upper portion of the canvas using a large flat brush, blending it smoothly as you work your way down. Add a touch of Burnt Sienna to the mix as you move lower on the canvas, creating a subtle gradient that mimics the cool, crisp air of autumn mornings.
For the distant trees, use a mix of Mars Black, Raw Umber, and Ultramarine Blue. Use a fan brush to create the impression of tree trunks and branches in the distance. These trees should be faint and slightly blurred to give a sense of depth, as if they are shrouded in early morning mist.
Step 4: Adding the Pathway
The pathway is a crucial element that draws the viewer’s eye into the acrylic painting tutorial. Start by mixing Burnt Sienna with a touch of Titanium White and Raw Umber to create a warm, earthy tone. Using a palette knife, apply this color along the pathway you sketched earlier. The palette knife will help you create a rough, textured look, which is perfect for depicting a leaf-strewn path.
As the path recedes into the distance, lighten the color by adding more Titanium White to your mix. This will create the illusion of depth, making the path appear as if it’s gently sloping upward.
Step 5: Painting the Autumn Trees
Now, we move on to painting the colorful autumn trees that make this scene so vibrant. Using a fan brush, start with the tree trunks on the right side of the pathway. Mix Mars Black with a little Raw Umber and use a flat brush to paint the trunks. Add highlights by mixing a bit of Titanium White with Raw Umber and lightly brushing it on the side of the trunks that face the light source.
For the foliage, use a mixture of Cadmium Red, Cadmium Yellow, and a touch of Burnt Sienna. Load your fan brush with these colors and tap it lightly on the canvas to create clusters of leaves. Vary the colors to reflect the different shades of autumn leaves, from bright reds to deep oranges and yellows. The combination of these colors will create a vibrant and realistic representation of fall landscape art.
To add more depth, layer the leaves by starting with darker shades (more Burnt Sienna) and gradually adding lighter shades (more Cadmium Yellow) on top. This layering effect will give your trees a lush and full appearance.
Step 6: Painting the Red Umbrella and Figure
The red umbrella is the focal point of this painting and will draw the viewer’s attention immediately. Mix Cadmium Red with a touch of Mars Black to create a deep red color. Using a small round brush, paint the umbrella, being mindful of the light source. Add highlights by mixing Cadmium Red with a little Titanium White and applying it to the top edges of the umbrella.
For the figure, use a mix of Mars Black and Titanium White to create a dark grey color for the coat. Paint the figure’s coat, leaving space for the legs and boots. For the legs, use the same color mix but with a bit more Titanium White to differentiate them from the coat. Paint the boots in Mars Black.
To add a touch of realism, use the liner brush to add fine details to the figure, such as the folds in the coat, the outline of the umbrella handle, and the reflection of the figure on the wet pathway.
Step 7: Adding Final Touches
With the main elements in place, it’s time to add the finishing touches to your autumn forest painting. Start by refining the background trees, adding more branches and twigs with a liner brush. Mix Mars Black with a small amount of water to create a fluid, ink-like consistency for these finer details.
Next, enhance the leaves on the pathway by adding more dabs of Cadmium Red, Cadmium Yellow, and Burnt Sienna. These additional layers will make the leaves appear more scattered and natural, contributing to the overall autumnal feel of the painting.
Finally, check the overall balance of colors and composition. If needed, add more highlights or shadows to certain areas to enhance the depth and dimension of the painting. For instance, you can add a subtle glow around the trees by lightly dry brushing a mix of Titanium White and Cadmium Yellow around the foliage.
Tips for Success

- Take Your Time: Acrylics dry quickly, so work in layers and take your time to let each layer dry before adding the next. This will help you build up depth and detail without muddying the colors.
- Experiment with Colors: Don’t be afraid to mix colors on your palette to find the perfect shades for your autumn landscape. The beauty of nature is in its variety, so feel free to get creative with your color choices.
- Use Reference Photos: If you’re unsure about certain elements, such as the shape of the trees or the placement of the figure, use reference photos to guide you. This will help you achieve a more realistic and cohesive composition.
Conclusion: Bringing Nature to Life Through Art
Creating an autumn walk painting with a red umbrella is a rewarding experience that allows you to capture the beauty and tranquility of the fall season. This acrylic painting tutorial has guided you through each step of the process, from preparing the canvas to adding the final touches. By using a combination of vibrant colors, thoughtful composition, and careful attention to detail, you can create a stunning piece of nature-inspired art that will resonate with viewers and evoke the peaceful ambiance of an autumn forest.
Whether you’re a beginner looking to improve your skills or an experienced artist seeking inspiration, this tutorial offers valuable insights into the art of capturing the essence of autumn on canvas. With patience and practice, you’ll be able to create your own unique version of this autumn walk scene, adding your personal touch to every brushstroke.
So, grab your brushes, set up your canvas, and immerse yourself in the world of fall landscape art. The result will be a beautiful, vibrant piece that reflects the enchanting allure of an autumn walk, forever captured in the strokes of your paintbrush.

Pingback: Rainy Night Painting: A Serene Stroll Through a Lamp-Lit Forest Path - akartisticvision.com1